I own a Craftsman tablesaw, and at the time of purchase I had no idea that they have a non-standard size miter-slot. I got a fancy hedgehog featherboard and when I went to use it, imagine my disappointment when I found that the slots were too small. I did a bit of research and found that Craftsman apparently when with these smaller slots; probably to sell more of their own slot runners, jigs, and sleds. Bummer.
I knew I wanted to make a tablesaw sled as part of my cutting board project so that I could cut the boards quickly and at a precise 90 degree angle. But I didn’t want to mess with these small slots, knowing any wooden runner I made would be small, likely to fail or break, or expand or shrink with weather and then not fit properly.
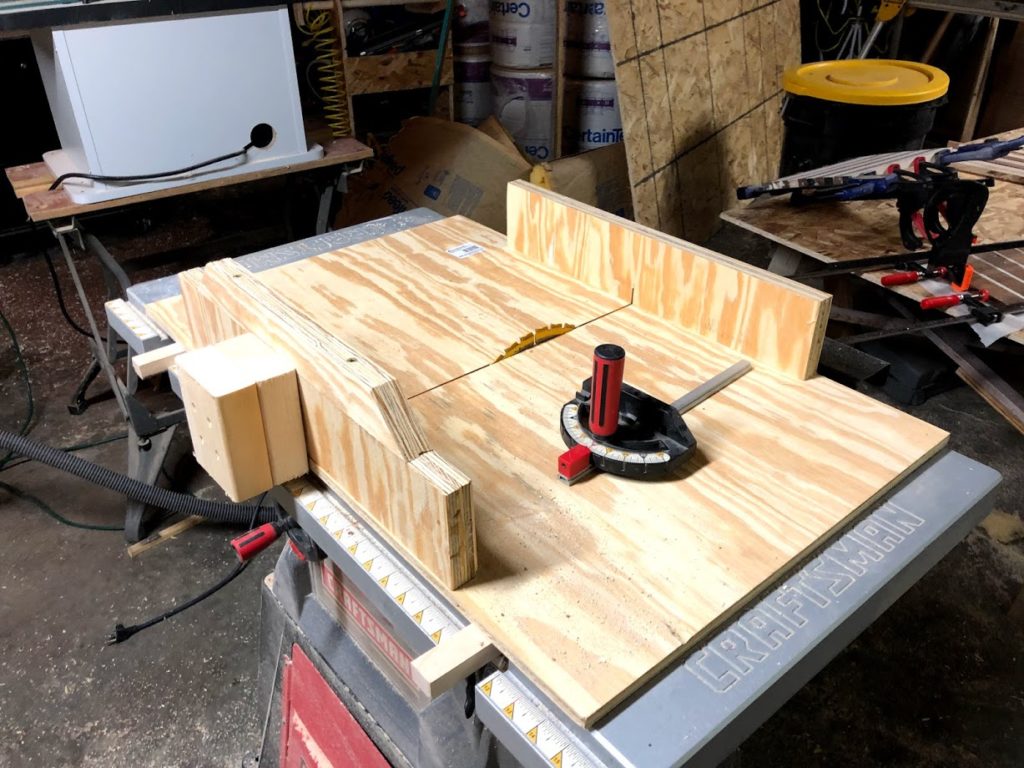
So here’s the work-around, and it’s simple: make the slot runners on the outside of the table. My saw has the adjustable wings that extend out, but the sides of the saw base are perfectly straight and smooth. So I cut some maple strips to act as runners that fit on each side of the saw.
To do this, I stole a trick from a video I saw from Foureyes on YouTube, where I cut the rails to size, used some spacers on the wing extenders so make sure the maple runners sat perfectly flush with the tablesaw top. I then covered them in wood glue, lined up the sled base on center, and then laid it down. Then I added some heavy things I had laying around the shop and let it sit overnight. The next day, I flipped it over and drilled countersink holes and screwed the runners in place. And it slid across the table perfectly.
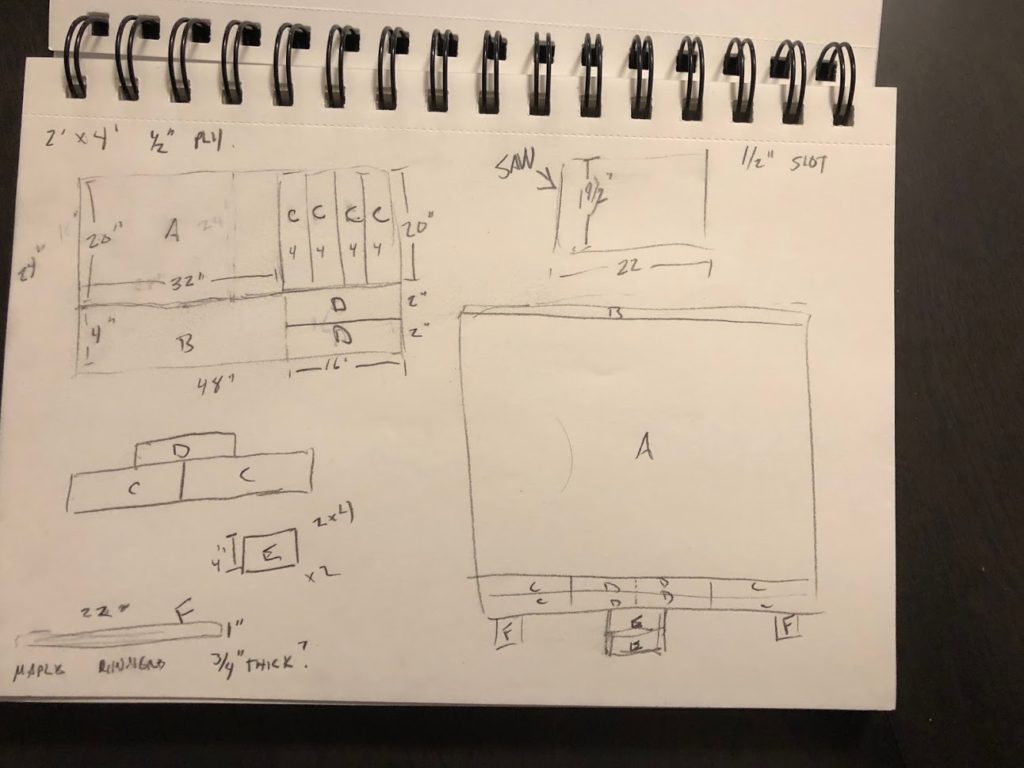 But I should back up. Before I cut anything, I drew up the design on paper and decided on a cut list. If I were to do it over I’d probably redo this, as my original plan was to have the back panel extend longer than the sled base, and to have the front panel be slimmer. I ended up bailing on that idea at assembly. Basically, I didn’t like the design of having to combine two separate pieces on the back panel at the center of the sled; I felt it left too many opportunities for failure on making sure that back panel was perfectly straight. For the panels, I cut four 20″ x 4″ strips and glued two of them together to end up with two 1″ thick pieces. Ultimately, I used one for the front and one for the back (see image and cuts C & D ended up moving and I didn’t use cut B at all). The maple runners are slightly longer than the sled itself at 22″, just to make it a bit easier to line it up and set it on the table.
I then attached the back panel to the sled by screwing in one screw on one side. Then I grabbed the speed square and used it against the back panel and the saw blade to make sure I was at a true 90 degree angle. Once that was lined up I screwed in the other side of the back panel and re-checked the angle. Once happy, I added more screws (countersink these as well). I didn’t add any wood glue here just in case I find later I really wasn’t as good as I thought at lining up the angle. It’s easy to remove the screws and adjust if needed.
I also added a front panel. I’ve heard this isn’t needed, but I wanted to the add the extra stability to prevent the sled from being flimsy on that end. Again, I avoided wood glue in case I ever want to remove it to make cuts on bigger pieces of wood. Someday I’m going to make that massive cutting board prep station. Someday.
On the back I added a couple 2×4 blocks dead center (cut E from the above image), right where the saw blade would be if I ever pushed the sled too far across the table. It’s just an extra safety measure to make sure the blade wouldn’t poke through while your thumb is back there pushing. I also made sure there was enough room on both sides of the block, so I can use the miter gauge in the slot runner on either side of the block. I can quickly screw this into the back panel if I want a handle there for extra leverage.
Finally, I added a French cleat to the top of the front panel. Then I can just hang it on the wall when I’m done and it’s off the saw table and out of the way (not pictured below, but you’ll see it at the end of the YouTube video above).
If you have a Craftsman tablesaw, I hope this is a viable solution you could use. Or if you have another brand and are just looking to make a sled, I hope you found something you could apply. If you see anything I could have done differently to make this better, I always appreciate the feedback.
Dimensions:
Base: 20″ x 32″ x 1/2″
Front and back panels: 20″ x 4″ x 1″
Back panel topper: 16″ x 2″ x 1″
Thanks for reading and watching. Cheers!
Grant