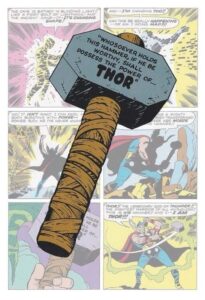
So, a buddy of mine sent me this pic and said he wanted one of these, but without the wording. This is the old school Thor hammer from the comics. Not the new fancy (and really difficult and complicated to make out of wood) version that you see in the Marvel movies today. Easy enough. But why make one when you can make four? So that’s what I did.
These are mainly to show on a shelf, or to let my kids run around the yard with, so I didn’t bother making them out of hardwood. I went with leftover 2×4’s I had left over from a previous project. They’d already been planed down, so I cut two 24” pieces and glued them together. Once the glue dried, I ran them through the planer until I had all four sides flat. I cut that piece into four smaller pieces, each about 6” wide, for the mallet heads. With cheap pine wood, I’d recommend taping your cut lines here; I had a lot of chip out that had to be sanded down. Same for when I cut the angles on the mallet heads. But for those I just measured in an inch on each side and used the speed square to make a 45 degree angle on each corner. Once I had my lines drawn I used the miter saw to cut them all off.
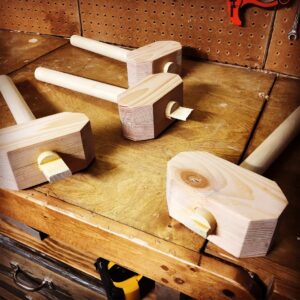
I don’t own a drill press, so I went to my brother’s shop to use his to cut the holes for the handles to go through. You don’t really have to do this, it’s just with a press you know you’re going to be completely level. But I could have certain used my drill and just tried to be precise. I used a 1 ¼” forstner bit here, but you can also use a paddle bit if that’s what you have. Once I got the holes done, I did a bunch of sanding.
For the handles I just bought a couple 1 ¼” dowels. I cut them to about 15” because I decided to go all the way through the mallet heads and come out about ¾” through the top, leaving around 11” for the actual handle. I then used my scrollsaw to cut mortises and tenons for the handle once I put it through the hammer head. In hindsight, this was overkill. Since these won’t be used for actual hammer use, I could have just drilled a hole about an inch deep on each side and wood glued the handle in one and a small stub for the top.
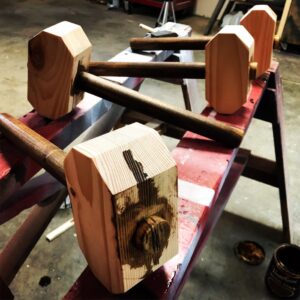 I used a couple different stains I had leftover on the handles, but you can’t really tell the difference; likely because they sat in the shop most of the winter. For the hammer heads, I painted two a gray matte finish. The other two I used a leftover spray can I had from when we had to replace a side mirror in our old car; I had like 90% of the can left so I thought it might look cool on these hammers since it had a charcoal look with some glimmer to it. I finished them with some spray matte finish polyurethane.
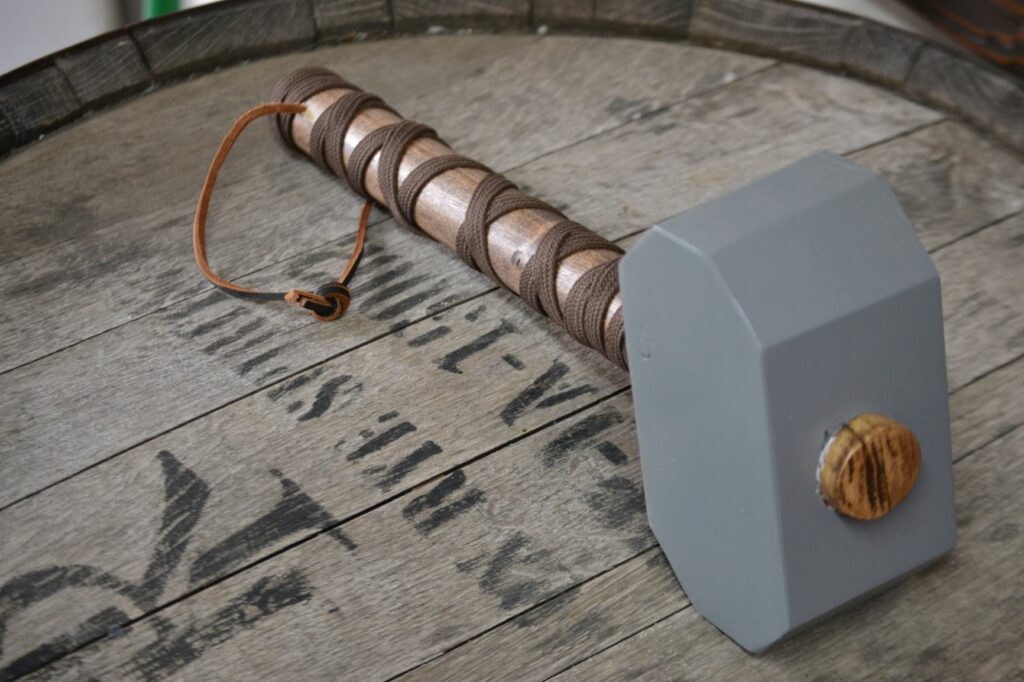
I bought some synthetic cloth wrap for the handles. I was thinking it would look something like you’d see on a samurai sword handle (it actually says that in the product description on Amazon). Turned out pretty well, but one 157” section ($12) only got me through two hammers. I also bought a 72” length of leather stripping, and that only got me enough for one hammer and cost me $18! Looks cool! But man, not what I was expecting. So I’d go with the synthetic stuff; links below. I just used a staple at the top, tapped it all the way in with a hammer, and then wrapped around the handle. I put an extra staple in the bottom and did my best to wrap around the staples to conceal them. The kids are already unraveling these things with pretty limited usage so I may have to rethink how I did the wrapping; and I’m open to suggestions! I also bought some leather strip cord for the bottom of each handle as a little tie. 5 yards cost $8 and I have plenty left to do more.
This was a simple and fun project that could definitely be made simpler in a few ways. If you don’t have a planer, just use a 4×4 post for the hammer heads and cut them down to size. And again, you can skip the entire mortise and tenon steps by just drilling smaller holes and using plenty of wood glue. Even the poly spray is probably excess if you spray paint everything. The kids are just gonna destroy them anyway. See anything I should have done differently? Let me know!
Hope you enjoyed reading and watching!
Cheers!
Grant

Items Used:
2×4’s
1 1/4″ dowels
Wood glue
Spray polyurethane, matte finish
Spray paint
Dark walnut and Kona stains
![]()