My son, Brooks, wanted a nightlight (mostly since I built his brother a Fire Truck Nightlight). He also seeks unparalleled power and universal domination. So, an Infinity Gauntlet Nightlight was the perfect idea!
I’ve had this idea in my head since I started the Fire Truck Nightlight, and I’m a big fan of all things Marvel. I especially like the Infinity War movie. And since building an actual, wearable, gauntlet is probably a bit above my pay grade at the moment, I thought I could make a pretty cool nightlight with this concept. And my idea was, rather than the movie version, I’d make it look like the original comic book cover art.
The concept is simple. There is a plywood base with trim. There are some small spacers that I wrapped LED lights around, and that the actual gauntlet will rest on. And the gauntlet itself is made out of hardboard, painted to look awesome, and has different colored transparent stones for light to shine through.
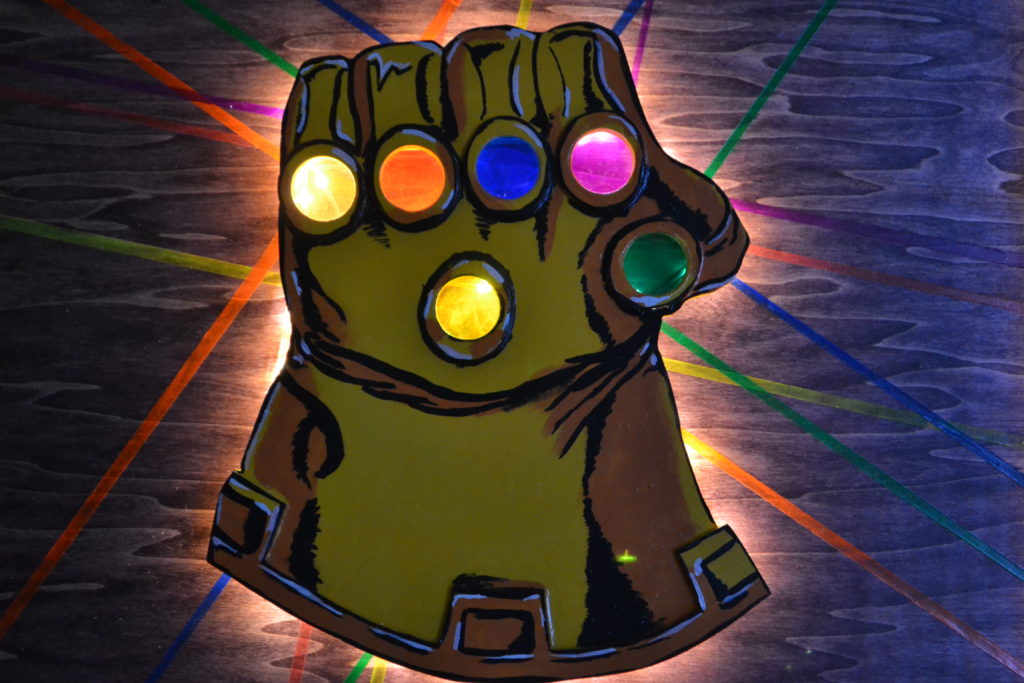
For the base I used a 2’ x 2’ sheet of ½” plywood (it wasn’t really 24” x 24”, so I had to rip it down on the table saw to 23” to make a perfect square). I used some black cherry stain that for some reason and turned purple, but since Thanos has purple skin, I figured it was perfect. I ripped down a 1 x 4 to get some 1” pieces to trim out the outside of the base, which I painted the same color gold I would use on the gauntlet. My original idea was to hand paint artwork looking like that original comic book cover art, but Brooks said that Thanos was too scary to be above his bed. So we improvised, and just did the purple-looking stain, and added colored beams coming off of each Infinity Stone. To do this effect, I just used painters’ tape to mark out the lines, and then used different neon acrylic paint.
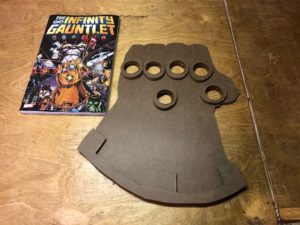 For the gauntlet, I used 3/8” hardboard. I cut it down to a 14” square, and then hand-drew the outline of the gauntlet in pencil. I also decided on adding a 3D effect, so I drew out some rings to go around each stone, as well as the buckles at the bottom of the gauntlet. I then cut all this out on the bandsaw, and then hand-sanded everything. I used some Elmer’s Pro Bond Advanced glue to attach all the pieces together and let it sit overnight.
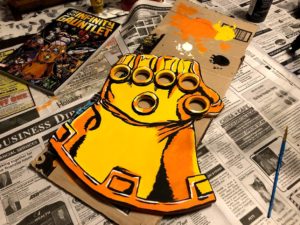 I added two coats of spray primer to the gauntlet, and then used acrylic paint to hand paint it. I just use the cheapest stuff you can find at Michael’s. If you do two coats it looks pretty solid. I did a gold base color, then added some orange shading. Then I outlined all the detail work with black, and finally added some touches of white to give a shiny effect.
Before adding finish, I added the spacers. These were just small pieces of 1 x 4, cut down to ¾” wide pieces. These are what the gauntlet will rest on, and what we will wrap the LED lights around. I arranged them on the base where they wouldn’t be showing, and made sure to not block the spots where the Infinity Stones are.
Once everything was painted, I put on two coats of semi-gloss polyurethane. I use a foam brush to apply, as I find it easier to bag up between coats and then just throw away when finished; no messy cleanup of an oily brush. After the poly dries, use some steel wool to smooth out the surfaces and then wipe everything down with a damp cloth.
Then I wrapped copper string LED lights around the spacers. I picked these up off of amazon. They’re easy to work with. I just used a piece of duct tape to attach the copper wire to the base, and then wrapped around the spacers in all directions so that lights would shine through the stones, and around the outside of the gauntlet. For the stones, I used some colored transparency sheets, also purchased from Amazon. I flipped the gauntlet over, and cut out the shapes of each color to glue on the different stones. The package of transparencies I bought didn’t include green, so I just put a blue and a yellow together. To attach the gauntlet to the base, I used some small Velcro squares that I picked up from the local hardware store. I want to be able to easily remove the gauntlet in case the lights ever go bad and need replaced.
And that’s it. The Infinity Gauntlet is complete, and lighting up Brooks’ bed each night. He’s super-pumped to have a light to rival his brother’s. Please check out the video linked above to see the full project build, and don’t figure to subscribe to the YouTube channel!
Things I learned…
I made the mistake of assuming the center of the base would be covered by the gauntlet, so that’s where I put the whole for the chord for the LED lights. Oops. Shoulda double-checked that, and the middle stone was overlapping the center, so the gauntlet isn’t perfectly centered on the base.
I also learned that I maybe shouldn’t have used the exact same lights I used on the Fire Truck Nightlight. These are both remote-controlled, and apparently the remotes will control any string set. So, both remotes control both night lights. Now my boys just get to mess with each other’s lights all the time. Whataya do?
Items used…
Copper string LED lights: https://www.amazon.com/gp/product/B076F5N1DB/ref=oh_aui_detailpage_o08_s00?ie=UTF8&psc=1
Colored transparency sheets: https://www.amazon.com/gp/product/B074Z58CH4/ref=oh_aui_detailpage_o04_s00?ie=UTF8&psc=1
Elmer’s pro bond advanced glue: https://www.amazon.com/Elmers-E7502-Professional-Multi-Surface-Weatherproof/dp/B00ARDVU4K/ref=sr_1_4?ie=UTF8&qid=1543188626&sr=8-4&keywords=elmer%27s+bond+glue
Semi-gloss polyurethane: https://www.amazon.com/Minwax-63005444-Drying-Polyurethane-Semi-Gloss/dp/B000VZNESE/ref=sr_1_3?ie=UTF8&qid=1543188643&sr=8-3&keywords=semi+gloss+polyurethane
Infinity Gauntlet comic book: https://www.amazon.com/gp/product/0785156593/ref=oh_aui_detailpage_o01_s00?ie=UTF8&psc=1