A good friend of mine approached me about making a balance beam. Seemed easy enough. Glue up some 2×4’s and attach some legs and boom! Balance beam! But as I got into it I began to realize there was going to be a kid jumping up and down on this thing repeatedly, so I wanted it to be sturdy and safe. So this is how I did it.
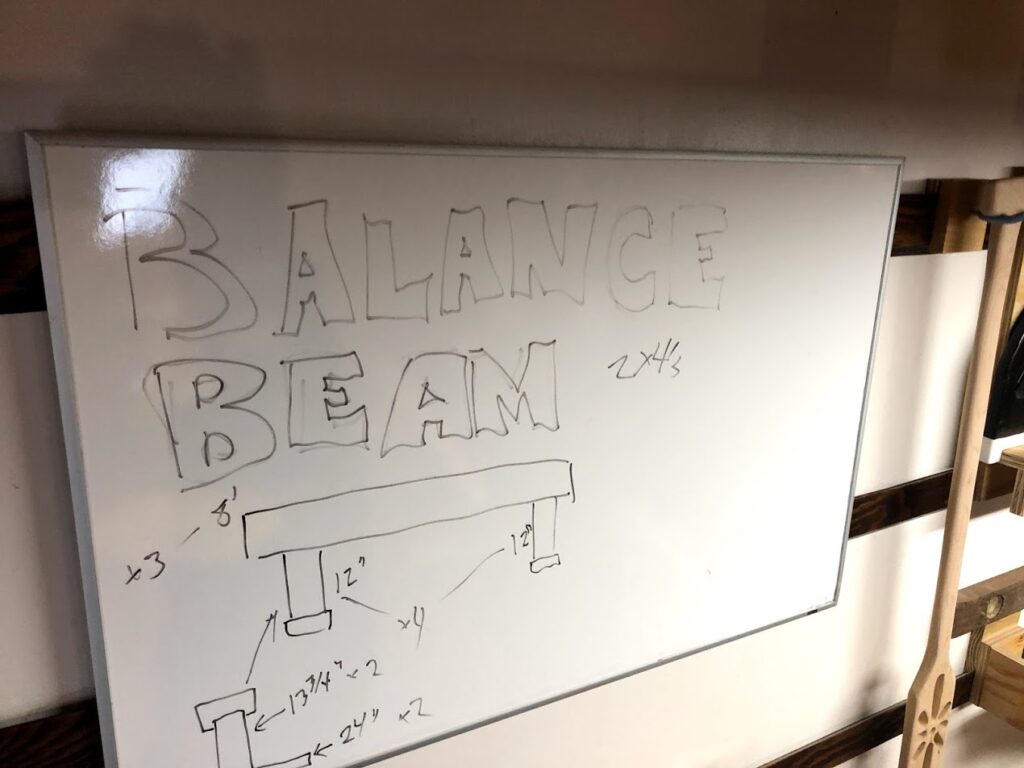
I got started by planing 2×4’s through my planer. If you don’t own a planer, you should just buy one. But if you can’t afford one, I suppose you could still get things rather flat by using a hand plane and killing a few hours. But anyhow, I smoothed out the sides on three boards on then glued them together. I gave it a day to dry, and then ran the beam through the planer, top and bottom, to get it totally smooth. With that done, I chopped the ends off each side of the beam with the chop saw, giving me an eight-foot beam.
Then I got to work on the legs. I needed two legs and wanted them 12” tall. But I wanted to do some tenons in the legs that would fit into mortises I would cut into the beam later. So, to make a leg I glued up three 2×4’s. Two that were 12” and one that was 13 ¾”, with the longer piece being sandwiched in the middle and extending out 1” on one side and ¾” on the other. The short end would act as the tenon to go into the base, and the other end would act as the tenon to go into the beam. Why different? Well, the base pieces are made from 2×4’s, so only 1.5” thick, and actually slightly less than that since I planed them down. So, I didn’t want to do too far through those base pieces. The top I could have don’t much more than an inch since the beam is about 3 ¼” thick, but an inch seemed like plenty.
For the base pieces I obviously needed one for each leg, and each base was to consist of two 2×4’s that were 24” long. I wasn’t sure that gluing up two 2×4’s would be stable enough, so I made some pocket holes in the bottoms of each base piece and screwed them together when I glued them up. Then I cut the mortises, starting with a forstner bit and finishing with my palm router and a chisel. If you watch the video, I’m sure you’ll make fun of my tiny chisel. This project lead me to purchase a real set of wood chisels.

With the base pieces finished I then glued the legs to the beam and glued the base pieces to the legs. Once dry, I flipped the beam right side up and then added some extra bracing. I got some stainless steal L brackets from the hardware store, and used those to attach base to legs, and legs to beam. But I still wasn’t 100% sure about stability. Again, there was going to be a kid jumping up and down on this thing hundreds, if not thousands, of times. So, I quickly cut a couple extra 2×4 pieces at 45 degree angles on each side and used them as extra braces connecting legs to the beam.
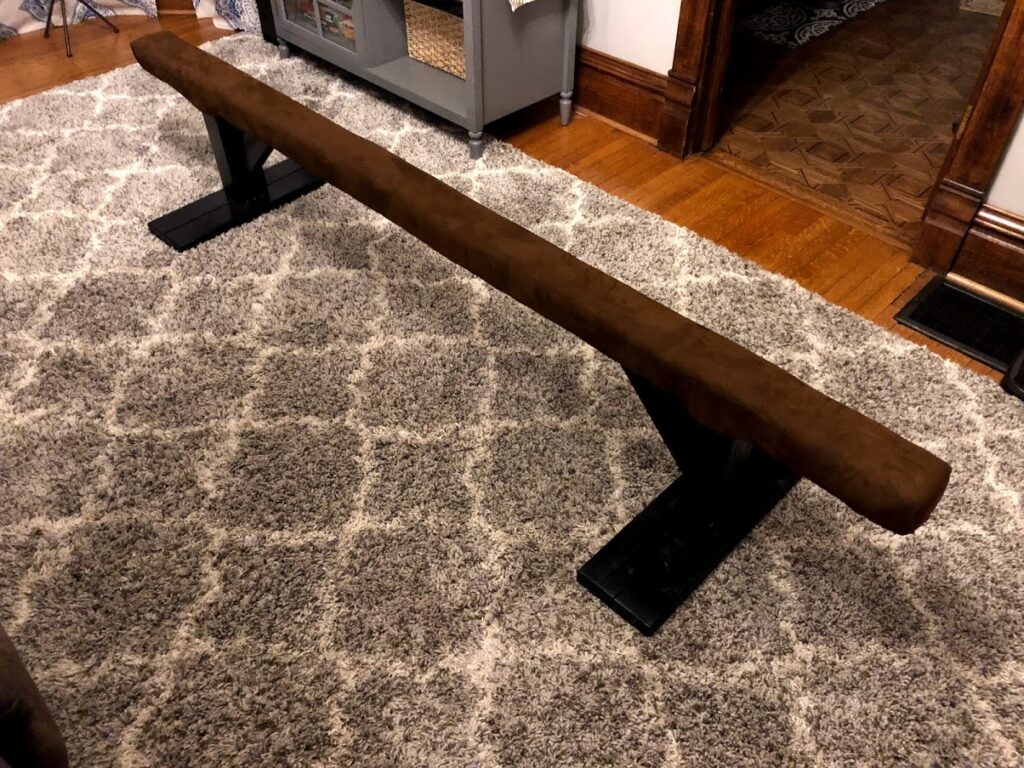
With the beam finished, it was time to add the foam padding and cloth. I don’t really know if it was necessary, but I sprayed the beam down with spray adhesive before laying down the foam. This was definitely a two-person job, so my wife helped pull the padding tight and around the bottom and I did all the stapling on the underside. I couldn’t find a roll of foam that was over 6 feet long anywhere, so I had to do two sections of foam (in the end it wasn’t noticeable). Once the foam was stapled down, I sprayed it with the adhesive and laid a strip of synthetic suede fabric over top and repeated that same process: pulling tight and stapling up from the bottom. I should not that the stapler wasn’t quite as powerful as needed, so I gave all the staples extra taps with a hammer to secure them. And that was it!
This beam wasn’t for my family, but we brought it into the living room, and the wife and kids and I all tried it out. It was solid and sturdy, and just soft enough with the foam padding. This was a fun project, and after all the fun the boys had on it that night I was a bit sad to see it go out the door. Probably just a good excuse to make another one.
Thank you for reading and watching!
Cheers!
Grant